A Sky on Wheels: The 1991 Toyota Pickup Transformed by Cloud Murals
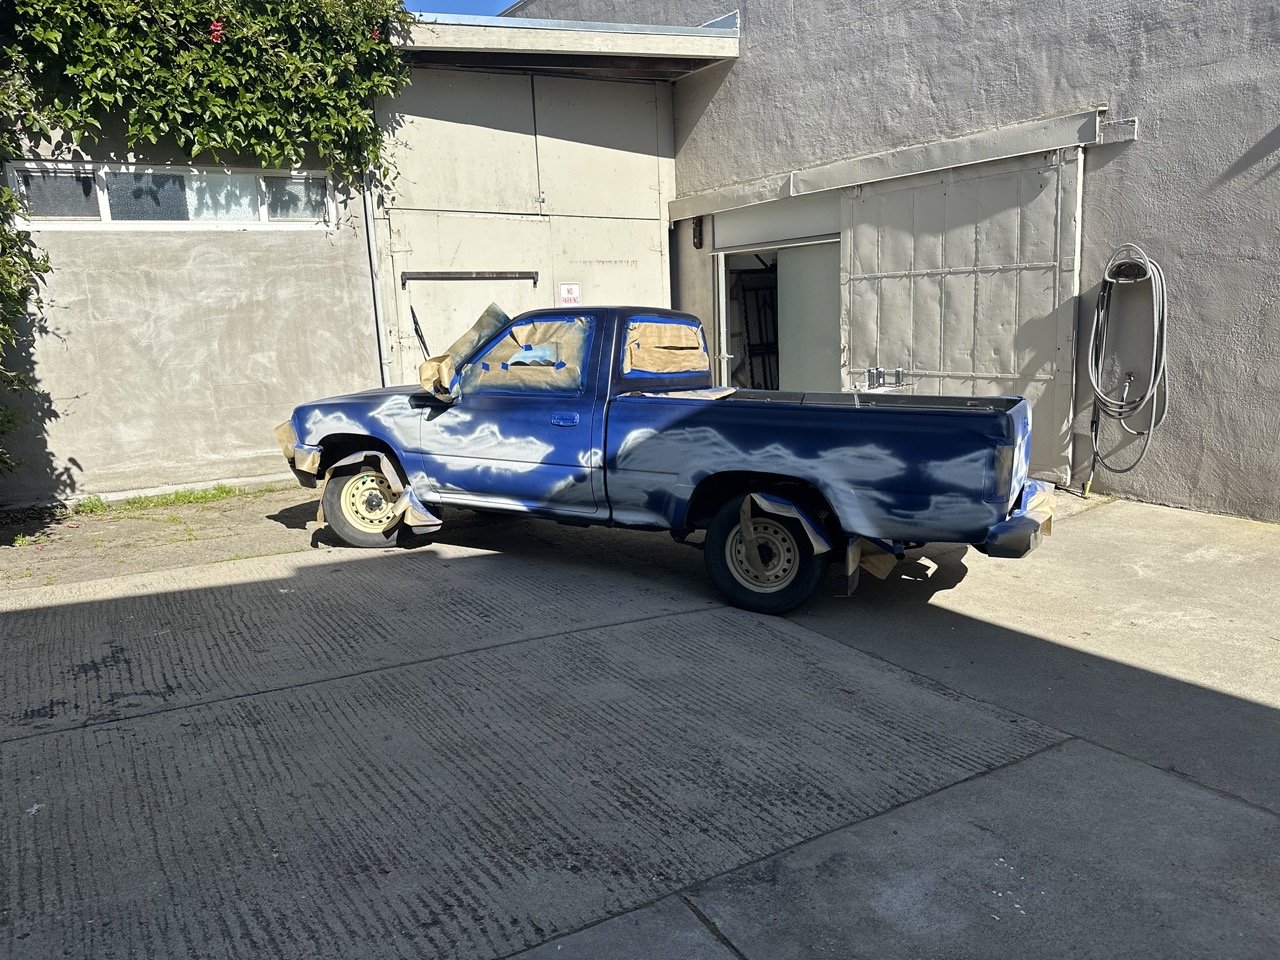
Journey into the realm of automotive art with our latest project—a 1991 Toyota pickup truck now adorned with realistic, fluffy white clouds against a dark sky. This blog post dives into the transformation process, the artistic challenges we faced, and the breathtaking results that turned a simple vehicle into a roaming piece of art.
Art, like a good storm cloud, has a way of sweeping in and transforming the mundane into the magnificent. Such was the case with our latest canvas—not a stretch of wall or a slab of wood, but a sturdy, reliable 1991 Toyota pickup. Yes, you read that right: we’ve turned a functional vehicle into a roaming spectacle of sky and cloud.
This project began as a challenge and morphed into a mission: to capture the essence of the sky itself and transpose it onto a vehicle that has seen its share of sunsets. The idea? To paint realistic, fluffy white clouds against a dark, impending sky across the body of this classic truck.
The process was meticulous. Painting on metal is no small feat, requiring a careful application of automotive paints that promise durability against the elements. Our first step was to treat the truck’s surface, ensuring it was free from any rust or imperfections that could mar our sky. Next came the base coat—a deep, dark blue that promised the perfect night sky.
Layer by layer, we built up the clouds. Using whites and grays, we focused on creating depth and realism, ensuring each puff appeared as if it might drift right off the truck. The technique used was similar to traditional mural painting but adapted to the curves and contours of the vehicle. It required a steady hand and an eye for detail, qualities our team has refined over countless projects.
The challenges were, as expected, as unpredictable as the weather. Working outdoors meant we were at the mercy of the actual sky, with wind and sunlight playing their parts in our daily drama. Paint behaves differently on metal than on drywall or canvas, drying quicker under the sun’s scrutinizing eye, and demanding swift, confident strokes.
But oh, the results! What a sight to behold—a 1991 Toyota pickup, reborn as a mobile masterpiece. It catches the eyes of passersby, who can’t help but pause and marvel at a piece of the sky moving among them on the roads. It’s a functional vehicle and a work of art, proving once again that beauty isn’t just where you expect to find it—it’s where you decide to create it.
In this project, we've blurred the lines between automotive design and mural art, showcasing our versatility and commitment to pushing the boundaries of traditional mural painting. Each stroke of the brush not only painted a picture but told a story of transformation and beauty, driving (quite literally) the point home that art is everywhere—on gallery walls, through city streets, and now, on a truck that carries the sky on its back.
For those inspired by this blend of art and utility, or perhaps looking to transform their own vehicles into moving murals, we invite you to reach out. Let’s bring your vision to the highways of the world, one brushstroke at a time.
Captivating Redwoods Mural at YMCA Santa Cruz Mountains
Spanning six large panels, each piece is a tribute to the iconic trees of the Santa Cruz mountains, creating a breathtaking backdrop for campers.
We've brought the towering beauty of the redwoods indoors with a custom mural at the YMCA camp. Spanning six large panels, each piece is a tribute to the iconic trees of the Santa Cruz mountains, creating a breathtaking backdrop for campers.
Elegant Japanese Cherry Blossom Mural in Mission District Home
Painted with vivid colors, this artwork turns a kitchen into a stunning visual celebration of nature.
Our newest mural in the Mission District captures the serene beauty of a Japanese cherry blossom. Painted with vivid colors, this artwork turns a kitchen into a stunning visual celebration of nature.
A Day in the Life: Behind the Scenes of Mural Magic
Hey there! Ever wondered what goes into making those jaw-dropping murals you see around town? Well, you're in luck because I'm about to spill the beans on our little art adventure.
First off, it's not just me. I've got my right-hand man, Cameron, and our furriest team member, Pandora, tagging along. Our mission? To hunt down the perfect supplies that'll bring our next mural to life. It's kind of like a treasure hunt, except instead of gold, we're after the best paints and brushes.
Imagine us zipping through the city, popping into quaint shops, and chatting up local vendors. It's all about finding those vibrant colors and durable materials that can stand up to our creative frenzy (and the weather, of course).
But hey, it's not just about the shopping spree. This is where the magic starts – where every can of paint and each brush holds the potential to transform a plain wall into a storytelling masterpiece. And guess what? We're taking you along for the ride, with a behind-the-scenes video that shows every step, from our supply run to the first stroke of paint.
So, if you're as excited about mural art as we are, keep an eye out for our video. It's a peek into the world of mural making, filled with creativity, community, and a dash of chaos (thanks to Pandora's antics). Can't wait to show you what we're working on!
Angles and Attitude: The World of Geometric Murals
Murals are mood magicians. They can dial down the stress with cool blues or pump up the energy with fiery reds. It's like having a backdrop for your life, setting the vibe for wherever you are – from the buzz of an office to the chill of your living room.
Geometric Mural in Office Hallway
Where Did Geometric Murals Get Their Edge?
Picture this: you walk into a room and bam – the wall's got attitude. That's what a geometric mural does. But who started this trend? Flashback to the 1950s and '60s with folks like Ellsworth Kelly and Frank Stella. They took simple shapes and made them pop, inspiring the eye-catching murals we see today.
Who Were the Artists Behind These Angular Visions?
Not just Kelly and Stella had a thing for angles and edges. Josef Albers played with nested squares, while Bridget Riley made stripes that seemed to dance. These artists laid down the rules for the kind of murals that now turn a plain wall into a main attraction.
Why Do These Murals Fit Right In?
Ever notice how a geometric mural can make a room feel... different? It's because they're more than just pretty patterns. They're like visual puzzles that can stretch a small room out or bring a vast space down to earth. It's all about giving a room personality and turning walls into fun.
Can a Mural Change the Feel of Your Space?
Absolutely. Murals are mood magicians. They can dial down the stress with cool blues or pump up the energy with fiery reds. It's like having a backdrop for your life, setting the vibe for wherever you are – from the buzz of an office to the chill of your living room.
The Art of Paint: Selecting the Perfect Palette and Finish for Your Office Mural
Transform your office into a canvas of innovation with Benjamin Moore's Aura paint. Known for its vibrant, fade-resistant colors and unmatched durability, it's the perfect choice for an office mural that's as enduring as it is striking. Opt for a matte or eggshell finish to keep your workspace's new focal point looking fresh and inspiring day after day.
When it comes to transforming an office space into a vibrant hub of creativity and style, nothing does the trick quite like a mural. And not just any mural, but one that speaks in the language of your brand with colors that pop and a finish that stands the test of time. With the attached mural as our muse, let's delve into the world of Benjamin Moore paints and finishes to guide you through crafting a mural that's not only a feast for the eyes but a smart choice for your workplace.
Choosing the Right Paint: Benjamin Moore's Palette of Possibilities
Benjamin Moore stands tall with a reputation for quality and longevity. When selecting the paint for your office mural, consider the Aura line, which is known for its fantastic hide, thickness, and washability. The Color Lock technology ensures that your chosen hues will remain vivid and resist fading over time.
Finish with Flair: The Sheen that Means Business
The finish of the paint can greatly affect the mural's visual appeal and durability. For office murals, which may see their fair share of sunlight and human interaction, it's wise to consider an eggshell finish. These finishes are adept at hiding imperfections and provide a subtle sheen that's not too glossy but still easy to clean - a perfect combination for high-visibility areas.
Durability and Maintenance: Making Your Mural Last
Durability is key in a bustling office environment. The Aura Interior Paint not only promises color longevity but is also durable against scuffs and marks. This means that your mural will stand up to the daily wear and tear of office life, and it can even be washed with soap and water if the need arises.
Aesthetics and Practicality: A Balanced Brushstroke
When designing your mural, balance aesthetics with practicality. The mural featured blends bold shapes with a thoughtful selection of colors that energize the space without overwhelming it. For ceilings and low-traffic areas, the Waterborne Ceiling Paint offers a flat finish that masks imperfections for a flawless look.
Decoding the Mystique of Mural Magic
A striking mural of a black bear amidst golden blossoms adorns a city building, symbolizing the harmony between urban life and nature.
A striking mural of a black bear amidst golden blossoms adorns a city building, symbolizing the harmony between urban life and nature.
Why Embrace the Mural Movement?
For the visionary developer, a mural isn't merely an aesthetic addition. It's a declaration of culture, an investment in the community, and a magnet for positive attention. Let's face it; a building with a mural sings louder than one with a plain wall. It becomes an Instagram hotspot, a landmark for directions, and a canvas that reflects your commitment to blending architecture with art.
The Bear Essentials: What to Consider?
Before the brush meets the wall, the developer's mind buzzes with queries. Here's how to navigate the artistry of mural-making:
The Artist: Who wields the brush? Choosing the right artist is pretty important. Finding a style that resonates with the building’s character a must.
The Process: What does the journey from a blank wall to a story in color involve? Collaborate closely with your artist. A masterpiece like 'Bear and Blossoms' can take weeks, planning the intricate dance of colors, ensuring the mural withstands time and elements, and of course, complying with any local art installation regulations.
The Community's Palette: How will the locals receive it? Engage with the community. A mural can be a tool for placemaking, fostering a sense of belonging. It's a dialogue, not a monologue.
The Cost: What's the price tag on awe? Mural pricing is as varied as the styles they come in. Factors include the artist's reputation, the complexity of the work, and the longevity of the materials. View it not as a cost, but as an investment in the building's cultural capital.
The Maintenance: Will the mural age like fine wine? Quality murals need upkeep. Regular cleaning, protection from graffiti, and touch-ups will keep the colors vibrant and the story fresh.
Turning Walls into Worlds: The Nursery Mural How-To
Bay Area Nursery Mural
Hey! So, you saw that mural pic, right? Painting one is pretty straightforward, but totally transforms the room. Here’s how it’s done:
Sketching It Out
First, we map out the scene on the wall. Think of it as the rough draft in a sketchbook – it’s where the magic starts. Hills, trees, rivers – they all start as simple lines.
Coloring the Canvas
Next up, painting! It's like filling in a coloring book, but on a larger scale. We mix colors to get those soothing shades of green, blue, brown, and a hint of gold. Each color sets the mood, kind of like how a good playlist sets the tone for a road trip.
Detailing Time
After the base colors are on, we dive into the details. This is where a blob becomes a bird, and a stroke turns into a stone. It’s the part that takes the most patience – like putting together a thousand-piece puzzle.
Final Touches
Finally, when all is painted and dried, the protective tapes come off, and there you have it: a wall that’s not just a wall, but a window to an enchanting landscape.
It’s about making the nursery a place where stories begin, with every glance sparking a little one’s imagination. And if you're thinking about doing this, I say go for it. It's less about being an artist and more about creating a space that feels good – for you and the kiddo.
So, how about it? Ready to make that nursery or any room a bit more magical? Let's chat about it, and maybe even make it happen!
How Much Does a Mural in the Bay Area Cost?
Here you will find an answer to how much a mural costs in the bay area.
Below are the factors that affect the final price of having your mural hand painted in your school, business, or home.
Size:
Size is a significant factor. It is probably pretty obvious, but the larger the area being painted, the longer it takes. It comes down to the adage: time is money. The size makes up about 30% of the total cost.
Wall surface texture:
Another common mural price factor is the wall's surface texture. Hand painting can be slowed considerably by a rough and matt surface texture. Luckily there are tricks of the trade that allow for hand painting on these surfaces, but they can be time-consuming. The percentage for a very bumpy texture can increase the price by as much as 25-35%.
Timing:
Working around regular business hours, like after 5 pm or on weekends and holidays, is often necessary. These unusual working hours also factor into pricing. It is not uncommon for a 10% increase in price if unusual hours are needed to complete a project.
Design choice:
Some lmurals are straightforward, and some can be very complex. This complexity is another significant factor when determining the cost of having a mural painted. The design complexity is the most considerable percentage of the cost. The complexity makes up about 60-70% of the final price.
Height:
The last factor I am adding is the physical location of the mural. Often temporary scaffolding can be used, which is relatively cheap, but sometimes man lifts are required to access the desired height. These lifts generally start at 600 dollars a day, but weekly rentals bring the price down to earth, costing around 1400$. Height usually factors less than other elements of the hand-painted sign cost and is about 15-25% of the cost.
Average price breakdown:
The average price for a mural is about 2500$. However, the above factors can significantly affect the project total. If the mural is small, uncomplicated, and on a flat texture, the base cost can be as low as 800$. Huge complex murals requiring man lifts can go up to as much as 15,000$
Feel free to call or email us if you want to explore your mural project. We will discuss your project and provide an accurate estimate free of charge. We have been painting murals in the bay area for over ten years and have the skills and professionalism to complete your project on time and on budget.
Phone: 760 803 8045
Email: bayareahandpaintedsigns@gmail.com
Minimal by design
Wisteria is a genus of flowering plants in the legume family, Fabaceae (Leguminosae). It makes for great murals. This one is minimal by design. I love the wispy feeling this work evokes. I did this one for a man named Tad in berkeley. I always thought his name was cool.
#mural #murals #muralart #muralpainting #wallmural #muralist #muralsdaily #wallmurals #muralarts #artmural #painting #wallart #artist #workplace #vinylgraphics #graphicdesign #walldecor #wallgraphic #walldecor #wallpaperprint #customwallpaperprint #walldecal
Sometimes all you need is a simple bit of text to enhance your workplace.
Sometimes all you need is a simple bit of text to enhance your workplace.
This project uses custom wall vinyl and paint.
Another Inchin's Mural is all wrapped up
One of my fav clients sent me to Chicago to help spruce up there newest location. Check out a Inchin's Bamboo Garden near you!
One of my fav clients sent me to Chicago to help spruce up there newest location. Check out a Inchin's Bamboo Garden near you!
Procreate Blog Series Intro
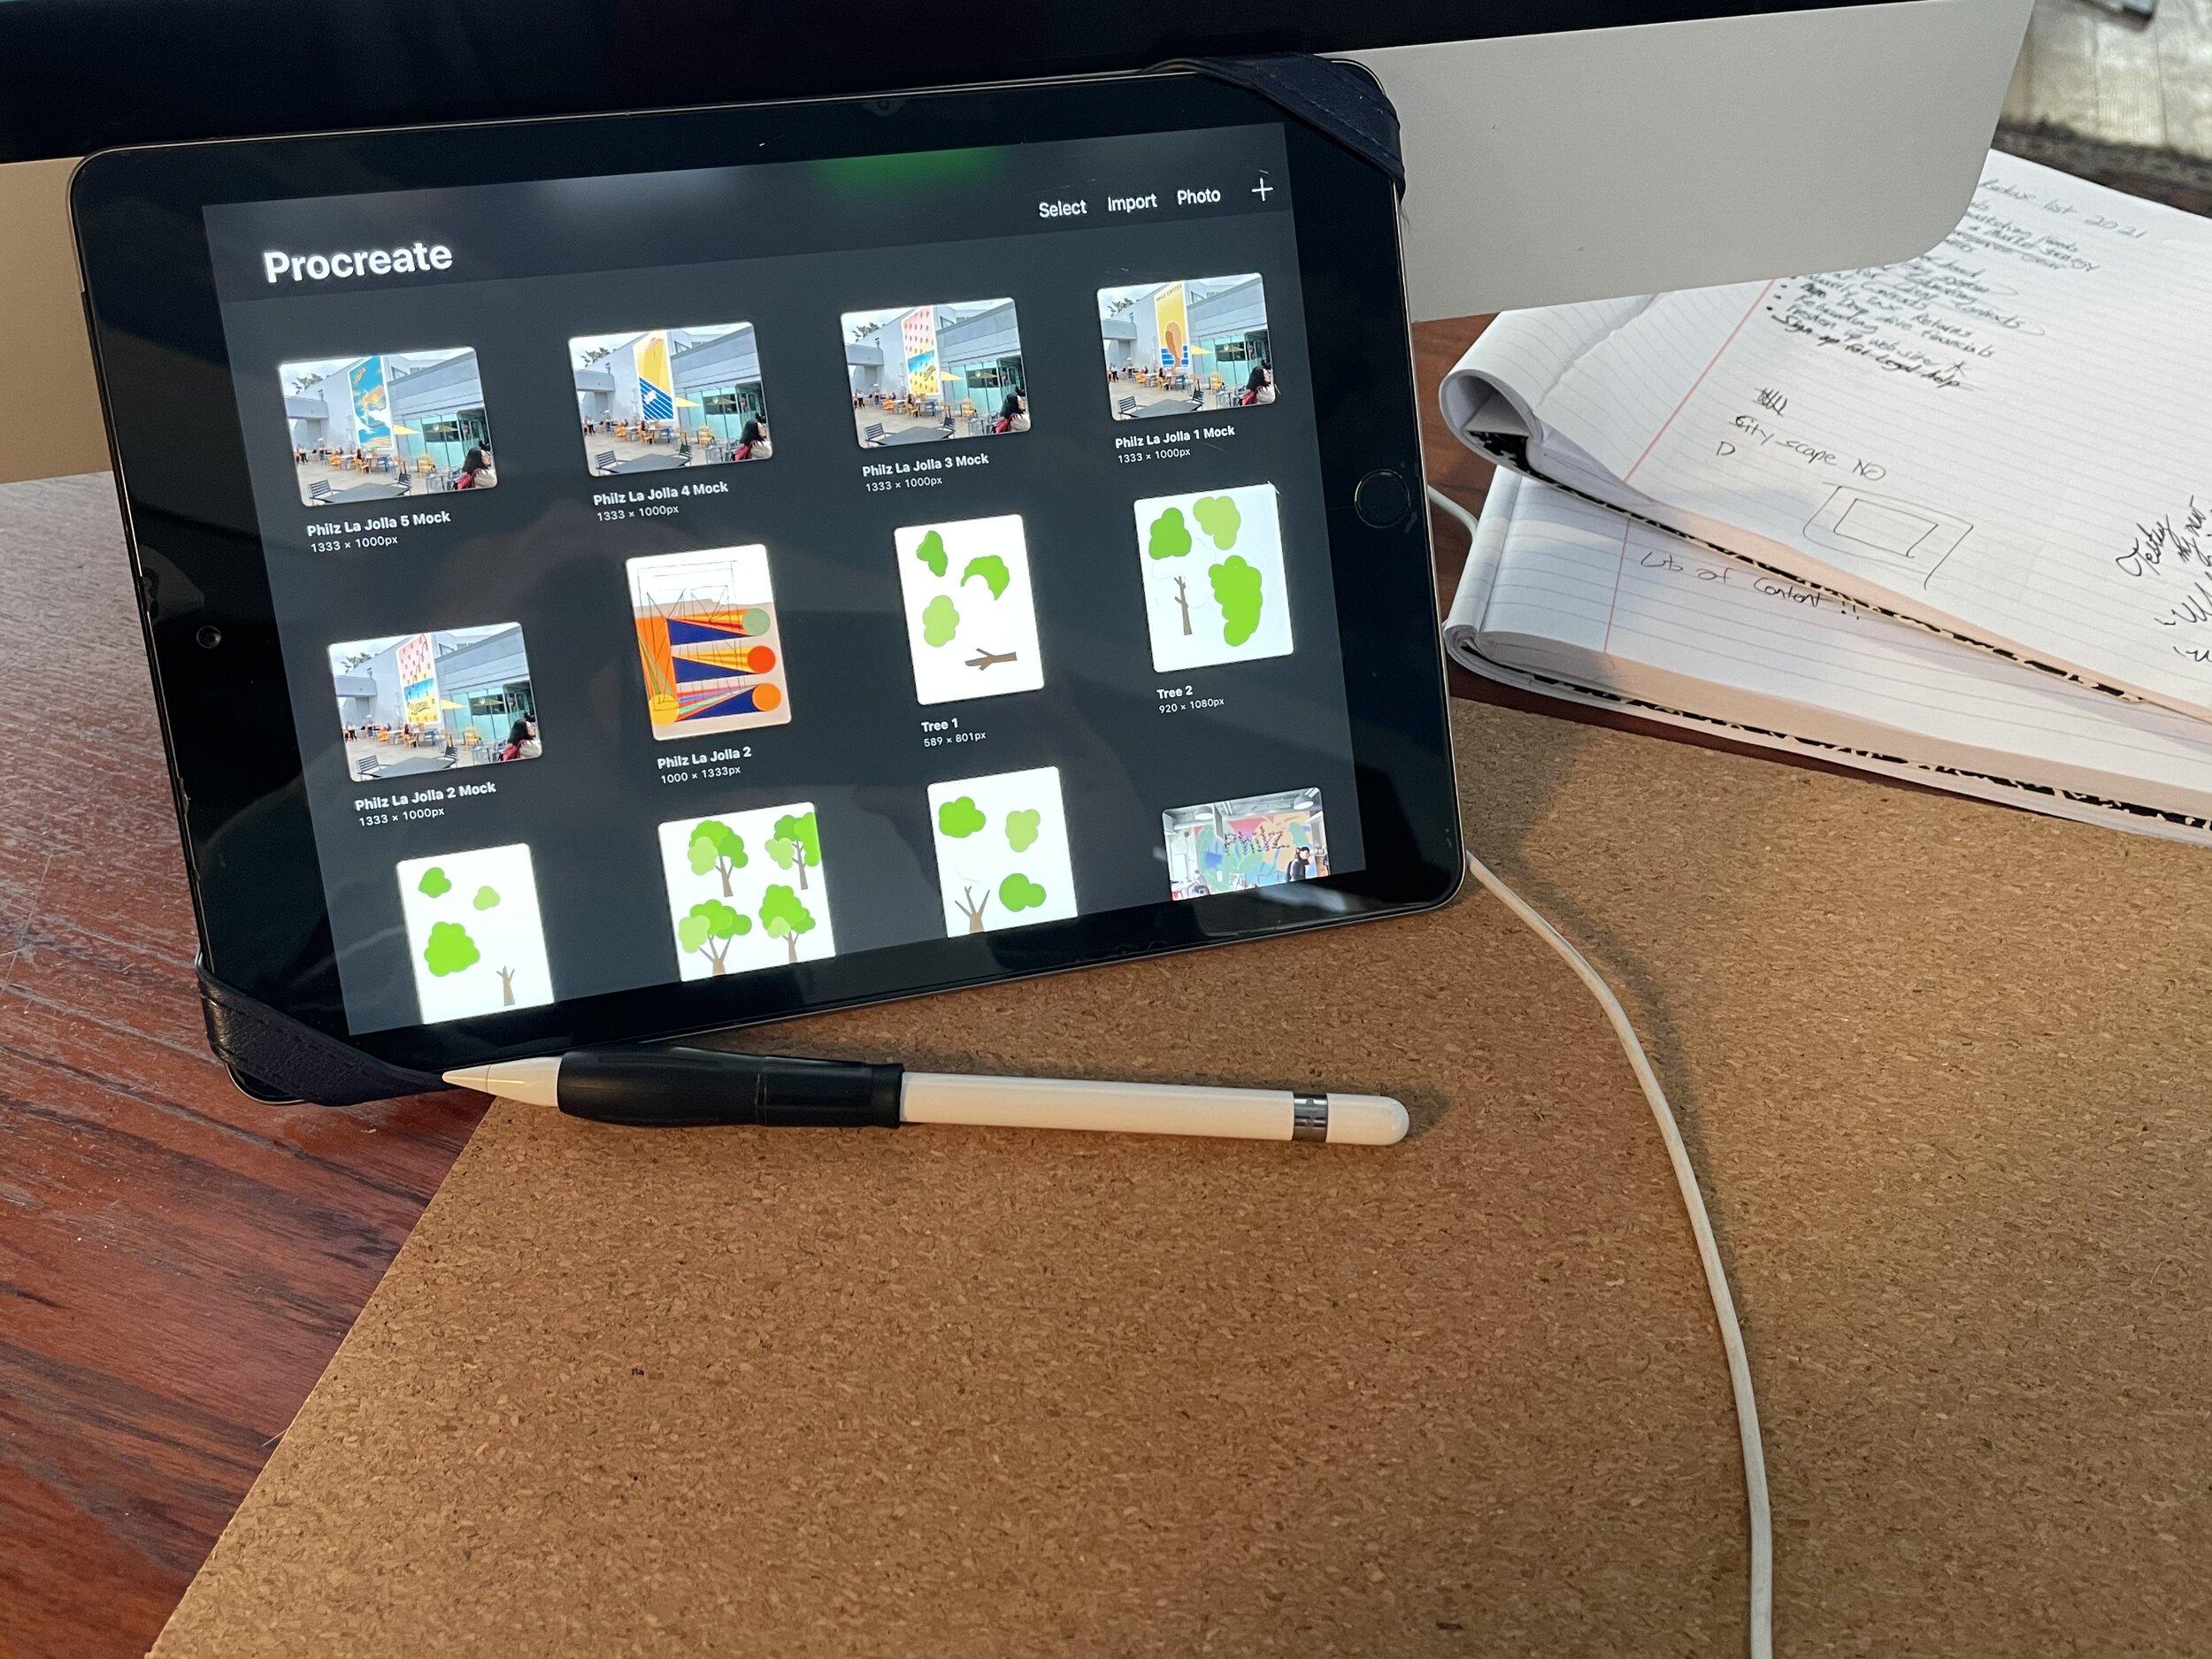
Hey all! Today I am going to start out the first in a series about how I use the app Procreate with my ipad and Apple pencil.
Before I had this tool mockups were slow and cumbersome. I used to have to use the wacom tablet/photoshop combo. While it was faster and cleaner than actual painting mockups it was not nearly as intuitive as an Ipad and Procreate. Clients always want to see a mock-up and an estimate before a job is green-lit. Procreate is so fast at mockups it allows me to show the client something in a day or even sometimes a few hours. There is so much I want to talk about with this app that I have decided to break it up into a series and in later instalments I will do some quick tutorials. Below is just a quick example of how I incorporate this tool into my workflow:
Client calls and requests a mural or sign.
-First I need pictures of the space and ideas about the sign or mural content
-I then bring both images into Procreate
- Next I create a mockup design
- After the design is finished I place that design on the image of the space
- A quick send off for the client’s thoughts and suggestions
- Lastly we make adjustments and get final design approval
But wait there's more!!!
-I schedule a project time and gather supplies
-I then use Procreate and a projector to trace onto the wall.
-While painting I have the procreate design with me for reference throughout the rest of the process
I am constantly finding new and amazing uses for this app. I am by no means an expert at Procreate but I have found some things useful and in this series I want to share them with you.
Dispose unused paints the right way!
Dispose unused paints the right way!
Throwing paint in the garbage is nasty! If it is oil paint it is down right criminal! It may be easy, especially if the paint can is almost empty or dried, but don’t do it! A lot of states allow water-based latex paint to be thrown away in the trash once solidified, but I just can't bring myself to do it.
Taking your paint to a hazard waste facility is the best way to keep the environment clean. This method also has an added benefit of providing good paying jobs. Lastly visiting a hazardous waste facility allows one to properly dispose of other chemicals you may have laying around the studio or house.
I have a place in my studio where I keep empty or unused paint in a protective cabinet clearly marked. Even though it is latex paint and not particularly dangerous it makes me feel better knowing it is as safe as possible. Once a year in the spring I make an appointment with my county hazardous waste facility and load up my truck.
Here are some places you can look for your paint disposing needs:
https://earth911.com/recycling/
Techniques for sharp edges when painting freehand
At one point in our collective history the most advanced way of applying paint to a surface was the simple finger. Nowadays we have about a zillion different methods. In this post I am going to briefly discuss one of these methods, the bristle. Specifically I will discuss how I use brushes to achieve sharp edges on large scale logos and murals.
Painting “freehand” on a wall is very tricky and can take years to master. For me it all depends on the relationship between paint consistency, bush design and wall texture. The important factor for brush design is that the brush holds a lot of paint in the bristles, holds them predictably and releases them reliably.
First I load the brush with paint. Then scrap some paint out of the well and feel the brush for weight. At this point I have a good understanding of where the paint is sitting in the brush. The next bit is the tricky part. Slowly I pull the brush toward the marked line and watch as the paint flows. If too much pressure is applied it will bleed, not enough paint and it will need a second pass. It is a slow process but can also be meditative if one can start from a mindful place. It takes practice to move quickly using the freehand method. Go slow at first and eventually it will be second nature.
My favorite brush to use for straight lines is from Proform. Their Picasso series brush is by far the best for getting perfectly sharp lines. The acid dipped tip releases the paint perfectly every time. Because of the oval shape the paint stays in the well of the brush and comes out smooth and predictably.
I hope you found this article helpful and If you have a project that requires sharp lines and need assistance please reach out!
Texture and Its Challenges
The big trend these days is to apply a vinyl printed sticker on a smooth office wall or glass. While I will not go into detail about the advantages and disadvantages to this process here, I will say that it is not very effective when a wall has even a small amount of texture. Wall texture is a big reason clients find use for my services.
To achieve a nice sharp edge on a textured wall is extremely challenging and time consuming. I employ a few techniques I have learned and will briefly describe them here.
The first is Frog tape. This special tape secrets a tiny amount of glue foam at the edges once it has been applied. This prevents paint from being sucked underneath gaps caused by the wall texture. It is an absolutely magical product that saves tremendous time and energy.
Second, is good ol fashion steady hands. A lot of time it makes sense to paint by hand. It is a skill not all can master. Using patience and a practiced technique I am able to apply paint on a wall with heavy surface texture.
Spray painting a stencil is another long practiced solution although it has its limitations. Over spay and bleeding can occur which make this method only viable in specific situations.
These are the main ways I am able to achieve a clean professional look on stubborn brick concrete and other textured wall surfaces.
If this is a problem you are facing please reach out and we can find the solution that works for you.
Rolling it out!
Today I want to discus how I utilize rollers to help me paint murals. It can be really nice to see the paint go up so fast and I have found that it is a great way to engage your body in the early stages of the paint process.
Today I want to discus how I utilize rollers to help me paint murals. It can be really nice to see the paint go up so fast and I have found that it is a great way to engage your body in the early stages of the paint process. This can come in handy especially if you are not totally sure where the project is going. There are a zillion aspects to fully comprehend the roller technique. House painters have figured out all kinds of tricks and tips over the years. I am only going to talk about the stuff I have found useful in my work.
Nap is what they call the thickness of the roller pad. Some are thick and apply extreme amounts of paint and some are very thin, subsequently applying thin doses of paint. The difference is based on how textured (or rough) the wall surface is. For example, stucco needs a very thick nap. Dry wall uses a normal–thin nap. I usually have a few of each type in one of my totes at any given time. I do not roll out walls for every job so I am not particular with the brand. Usually I just grab the value pack at my local paint store.
Most of the time I am not painting full walls but smaller sections of the wall depending on what the specific artwork calls for. For that reason I recommend getting a few of the smaller 4 and 6 inch rollers. They are great at blocking in smaller sections. You can certainly use a brush for this, but there are some great advantages to using a roller. Rollers apply a thin even coat, this can save money by not using too much paint and time by reducing the need to brush on large sections.
There are some accessories to roller painting I find super helpful. A two-foot extender is a must. They screw on the bottom of your roller and allow you to use new and exciting muscle sets. Very important! You can go to your local paint store and buy a new one, but I recommend you search for one at a flea market or an estate sale. Why is this? The feel of a wood extender that has seen many paint projects has an effect on my subconscious. I know in the back of my brain somewhere I am feeling all the projects that came before. It is a simple thing to feel but all the little things add up. Also they don’t really break. The same goes for trays and cleaners. The trays they made 40 years ago are rusty and old but they still work just fine. Throw a coat of primer on them and they are as good as new. The plastic ones are junk and made for one use. Don’t buy them. They also make this tool for cleaning the roller. This is what mine looks like. To use it, you just sort of squeegee off the paint and wash like a normal brush. Pretty handy eh.
The fan method of roller painting is pretty useful I also feel it comes pretty intuitively. That’s where you just fan out subsequent roller passes so that paint does not just sit at the two edges. This happens because paint gets squeezed to the two sides as you apply pressure. If you fan out your passes you can pick up the access paint and apply it to another section of the wall.
Blending and artistic uses for rollering are not so easy. I have experimented with multiple colors in the tray and attempting color fades using a roller. Both experiments left me going “yeah that’s never going to work”. Ultimately there is just not enough control. I have seen it used as a giant marker to make letters and designs. I find that this always looks somewhat loose. It has an unfinished quality to it.
Rollers are a must if you have a mural painting business. Hopefully these tips will help you and your future mural projects. Okay well that’s all I have on how I implement rollering into my mural practice. Hope you found it somewhat interesting and keep rollering!


